Action button is not possible in Service as siteapplications. it will work only with Application resource.
Author Archives: Admin
Is it possible to create action button in mainservice of an APS package?
Action button is not possible in mainservcie of a package .it will availabale only in subservice.
Creating Action button in APS package
We can create our own button in customer control panel using the class action. This button also like ‘Upgrade’,’Uninstall’ buttons.
Follow the below steps to create action button
—————————————————-
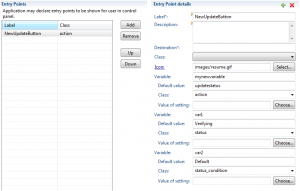
In Eclipse go to Entry Points Tab
1. Label -> NewUpdateButton
2. Description-> Keep it as blank (optiional)
3. Destination-> Keep it as blank (optional)
4. Class-> keep it as blank
5. Icon-> Image file from the images folder- images/resume.gif.
6.Variable-> mynewvariable( this will be settings variable)
7.Defaultvalue->updatestatus
8.Class->Action
9.value of settings-> keep it as blank
10. variable->var1
11.Default value->verifying
12.Class->status
13. value of settings->keep it as blank
14.variable->var2
15. Default value->Default
16. Class-status_condition
17. Value of settings->keep it as blank
Above settings will be view as in the source section of eclipse as below
————————————————————-
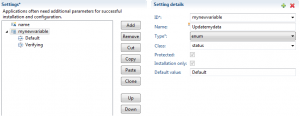
Go to the settings tab of the same service.do the following variables adding.means create an enum fields with choice fields
1. ID->mynewvariable
2. Name->Updatemydata
3. Type->enum
4. Class->status
5. Protected-make as checked
6. Installation only->make as checked
7. default value->Default Value
In the choice field add below two items
ID->Default
Name->Default{color:red}
ID->Verifying
Name->Verifying{color:yellow}
Above settings will be view as in the source section of eclipse as below

Uploading the package in the PA server in APS2.0
There are three server details needed to do this
1.PA server
2.ssh to connect endpoint server
3.ssh to connect PA server.
Step1 : Upload the package into PA server using Services->Applications->import package.
Step2: Connect the Endpoint server using SSH. Upload the package into the endpointserver.
(Note:Upload path-var/ww/html)
Step3: Go to the endpoint server terminal window
From SSH go to #cd /var/www/html
Then run # sh endpoint.sh foldername packagename-1-0.app.zip
In this Step you will get enpoint as http://endpoint.com/foldername
Step4: Go to PA server Click on the package-Go to Instances.
Enter the endpoint created in the previous step to the APplication API end point URI
How to build and validate a package in APS2.0
IF the Eclipse2.0 environment not supporting the Package Build and validation then use the
following method.
1)Install the APStools on your machine.
2)Go to Command Prompt using Run-cmd command.
3)cd C:\Program Files (x86)\APSStandard.org\APSTools
4)C:\Program Files (x86)\APSStandard.org\APSTools>apsbuild D:\workspace\Helloworld
5)C:\Program Files (x86)\APSStandard.org\APSTools>apslint -v D:\workspace\Helloworld-1-
app.zip
note:here D:\workspace is the path of your eclipse.After building the package the package
will create outside of your package folder means inside workspace. not in the Helloworld
folder.
Application configuration script reported errors: ‘env: php: No such file or directory ‘ why showing this error in APS package?
This error is usualy show while clicking on the create button in the Customer control panel
(CCP). This is because of PHP/Apche attribute is missing in the Resource type/Provisioning
attributes tab.
If PHP Attributes is not available in the provisioning attributes tab, Use the following
steps to make it available.
Please follow the below Steps
1. Install PHP to the PA server using command line prompt. for this use the command
yum install php
2. After installing php, login into the PA server
Then Products -> Resources -> Attributes -> Add New Attribute
Give Attribute name PHP and Attribute description PHP
Then Submit
3. go to Infrastructure -> Hardware Nodes
Click on Appache related node -> General TAB -> Attributes -> Assign
Select PHP
Note: In step3 if you add php to mysql/or some other nodes it will not work.you must add it
to apache/php related node.
After finishing the above steps “PHP” attributes will be available Provisioning attributes
of your application resource type.
Auto populating customer login name into the service settings
Please use the class name=’login’
Select Clause to find out the current timestamp?
See the Example
Select * from mydoubts_data
+———+————————-+——————–+
| EMPCODE | NAME | SALARAY CODE |
+———+————————-+——————–+
| 787 | Vasanthan | K |
| GORT | Shaji | S |
| GKL | James | P |
| IND | Abdul | ZO |
| VIS | Sunil | F |
+———+————————-+——————–+
For Example
select now();
+———————+
| now() |
+———————+
| 2014-02-21 10:25:47 |
+———————+
IN and NOT In using mysql
See the Example
Select * from mydoubts_data
+———+————————-+——————–+
| EMPCODE | NAME | SALARAY CODE |
+———+————————-+——————–+
| 787 | Vasanthan | K |
| GORT | Shaji | S |
| GKL | James | P |
| IND | Abdul | ZO |
| VIS | Sunil | F |
+———+————————-+——————–+
IN and NOT in is an alias for where clause.
For Example
select * from mydoubts_data where SALARY CODE in (‘K’ , ‘S’);
+———+————————-+——————–+
| EMPCODE | NAME | SALARAY CODE |
+———+————————-+——————–+
| 787 | Vasanthan | K |
| GORT | Shaji | S |
+———+————————-+——————–+
Distinct record selection using mysql
See the Example
Select * from mydoubts_data
+———+————————-+——————–+
| EMPCODE | NAME | SALARAY CODE |
+———+————————-+——————–+
| 787 | Vasanthan | K |
| GORT | Shaji | S |
| GKL | James | P |
| IND | Abdul | ZO |
| VIS | Sunil | F |
+———+————————-+——————–+
For only Distinct record use the following query.
distinct will show unique record it will not allow duplicate values.
select distinct SALARAY CODE from mydoubts_data;
+——————–+
| SALARAY CODE |
+——————–+
| K |
| S |
| P |
| ZO |
| F |
+——————–+


